
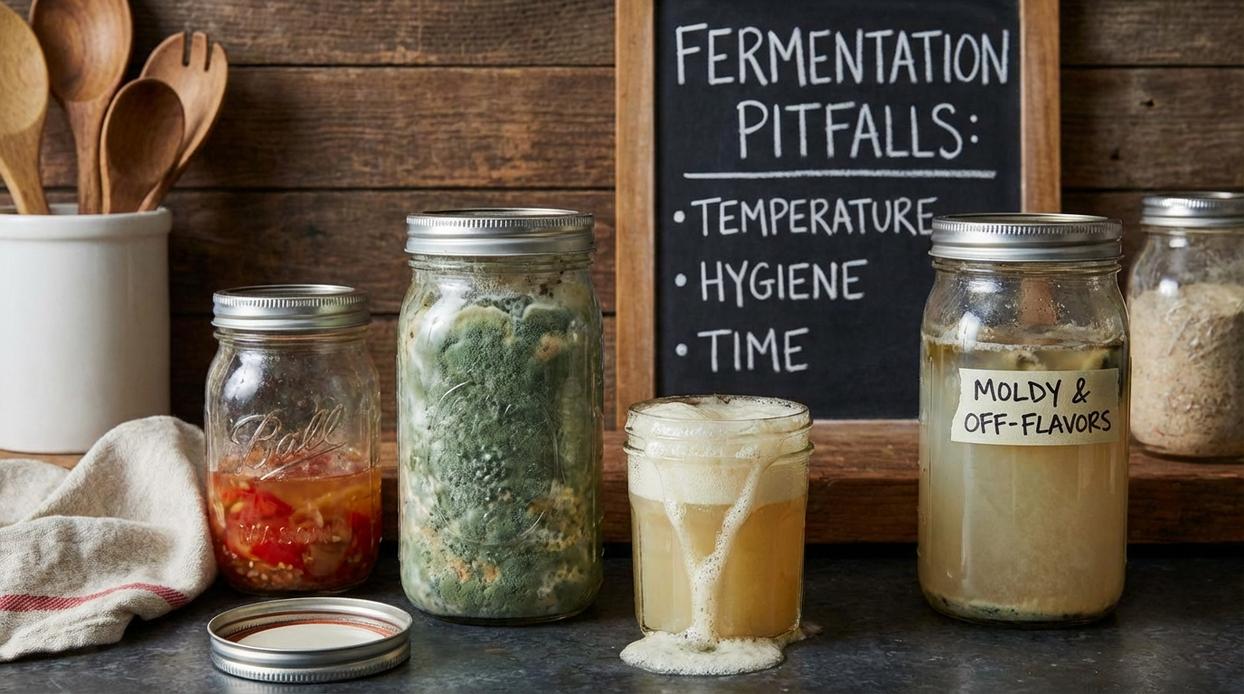
If you’ve ever been curious about fermenting your own foods at home, you’re probably searching for clear, practical guidance—especially on the fermentation mistakes to avoid. Fermentation can elevate flavors, boost nutritional value, and transform simple ingredients into complex, tangy creations. But small missteps in hygiene, salt ratios, or temperature control can quickly turn an exciting experiment into a disappointing (or even unsafe) result.
This article is designed to help you ferment with confidence. We’ll walk through the most common pitfalls beginners and home cooks face, explain why they happen, and show you exactly how to prevent them. From choosing the right containers to spotting signs of healthy fermentation, you’ll gain actionable tips you can apply immediately.
Our guidance draws on tested culinary techniques, food safety best practices, and hands-on experimentation with flavor fusion and traditional preservation methods—so you can focus on creating bold, vibrant ferments without the guesswork.
Fermentation transforms humble cabbage into tangy sauerkraut and fiery kimchi—complex, probiotic-rich foods created by beneficial bacteria (microbes that convert sugars into acids). Yet many beginners hesitate. What if mold forms? What if jars explode from trapped carbon dioxide? These fears are common, but manageable.
First, salt correctly: use 2% salt by weight to create a safe brine. Next, submerge everything fully; oxygen invites spoilage. Then, “burp” jars daily to release pressure.
These simple steps eliminate common fermentation mistakes to avoid and build confidence. With clean tools and patience, you’ll unlock deeper, reliable flavors at home. Batch after batch succeeds consistently.
Mastering the Basics: Why Cleanliness is Your First Ingredient
By understanding common fermentation mistakes and how to avoid them, home cooks can not only elevate their culinary skills but also align with the Top Global Food Trends Shaping Modern Kitchens today.
At its core, fermentation is about creating a selective environment—a controlled space where beneficial bacteria (like Lactobacillus, the microbes that produce lactic acid) flourish while harmful microbes cannot. Cleanliness isn’t optional; it’s the gatekeeper. If you remember nothing else, remember this: sanitize first, ferment second.
Start with a simple checklist. Wash equipment in hot, soapy water. Then choose one: run jars through a high-heat dishwasher cycle, submerge them in boiling water for 10 minutes, or use a food-safe sanitizer. Let everything air-dry (towels can reintroduce bacteria—yes, really). These steps dramatically reduce fermentation mistakes to avoid.
Next, choose your vessel wisely. Glass jars are affordable and non-reactive (my top recommendation for beginners). Ceramic crocks are excellent for large batches but heavier and pricier. Fido jars have clamp lids that create a semi-sealed environment; however, adding an airlock is even better. An airlock allows carbon dioxide to escape while keeping oxygen out—preventing mold growth.
Finally, control temperature. Most lacto-ferments thrive between 60–75°F (15–24°C). Too hot speeds spoilage; too cold stalls activity. Try placing jars in a cooler corner, inside a cupboard, or wrapped in a towel to buffer fluctuations. Consistency wins every time.
The Science of Success: Nailing Your Ratios Every Time
I learned the hard way that fermentation is less “rustic magic” and more controlled science. My first sauerkraut batch? Mushy, overly salty, and suspiciously funky (and not in a good way). The culprit, as it turns out, was guessing.
First, let’s talk salt. Salt inhibits spoilage microbes—harmful bacteria that cause rot—while allowing beneficial lactic acid bacteria to thrive. It also draws water from vegetables through osmosis (the movement of water across cell walls), creating its own protective brine and preserving that crave-worthy crunch. Some argue you can just “salt to taste.” However, inconsistent salt levels are one of the most common fermentation mistakes to avoid.
That brings us to measurement. Always measure by weight, not volume. A tablespoon of coarse salt and a tablespoon of fine salt weigh very different amounts. Instead, use this formula for a 2–3% brine: (total weight of vegetables + water in grams) × 0.02 = grams of salt needed. A digital kitchen scale isn’t optional—it’s your MVP (yes, more reliable than eyeballing it like you’re on a cooking show finale).
Meanwhile, sugar often gets misunderstood. In kombucha or water kefir, sugar feeds the SCOBY (Symbiotic Culture of Bacteria and Yeast) or kefir grains. Most of it is consumed during fermentation, transforming into acids and carbonation.
Finally, starter cultures can help. Adding brine from a previous batch or a commercial culture gives beneficial microbes a head start. I once skipped this step and watched mold win. Lesson learned: control the ratios, control the outcome.
The Art of the Wait: Active Steps for a Passive Process
The Golden Rule: Below the Brine, Everything’s Fine
Fermentation is simple, but it’s not careless. Any ingredient exposed to oxygen becomes a potential mold hotspot (and mold is not the fuzzy friend you’re looking for). Oxygen invites unwanted microbes, while a fully submerged environment favors beneficial lactic acid bacteria—the same microbes responsible for yogurt and sourdough.
Practical Submersion Techniques
Keep vegetables safely underwater with:
- Glass or ceramic fermentation weights (non-reactive and reusable)
- A folded cabbage leaf barrier to tuck stray shreds below the surface
- A small ziplock bag filled with brine to press everything down
Each method protects flavor and texture while reducing contamination risk—key fermentation mistakes to avoid.
Managing Carbon Dioxide
Active ferments release carbon dioxide. If you’re using a standard lid, “burp” the jar daily to prevent pressure buildup. Better yet, install an airlock lid. It automatically vents gas while blocking oxygen (a small upgrade, big peace of mind).
Reading the Signs
Healthy fermentation looks and smells like:
- Gentle bubbling
- Cloudy brine
- A clean, pleasantly sour aroma
Warning signs include fuzzy mold or putrid odors—discard immediately. For deeper safety principles, review the science behind safe food fermentation practices.
Patience is passive. Protection is not.
From Ferment to Feast: Storage and Culinary Integration
First, knowing when it’s done comes down to taste. Tanginess signals lactic acid—the natural preservative created by beneficial bacteria (microorganisms that transform sugars into acids). Taste weekly; your palate is smarter than any airlock. However, some argue for strict timelines. In reality, temperature and salt shift outcomes, so tasting prevents fermentation mistakes to avoid.
Once it sings, refrigerate. Cold storage drastically slows microbial activity, preserving crunch and complexity. For long-term success, keep vegetables submerged under brine in airtight jars; oxygen invites mold (and nobody wants a science experiment gone wrong). Pro tip: label dates and salt percentages for repeatable results.
Meanwhile, integrate boldly. Add sauerkraut to grilled cheese, kimchi to fried rice, or whisk pickle brine into vinaigrettes for bright acidity. Think of it as flavor fusion—your fridge becomes a quiet culinary DJ remixing every meal. Even tacos love fermented crunch daily.
Your Fermentation Journey Starts Now
Success in fermentation rests on three pillars: impeccable cleanliness, precise salt ratios, and keeping everything submerged. Master these, and you eliminate the common fermentation mistakes to avoid that trip up beginners. While the process can seem like a lab experiment (cue the Breaking Bad jokes), it’s actually simple, repeatable science. Follow the fundamentals and you gain confidence, better flavor, and gut-friendly benefits backed by research on probiotics (Harvard Health). No guesswork—just results. Start small with sauerkraut or pickled carrots. Each bubbling jar builds skill, saves money, and delivers that deeply satisfying, “I made this” moment.
By now, you’ve explored the essential techniques, flavor pairings, and prep strategies that turn everyday cooking into something truly memorable. Your goal was simple: create better-tasting food with more confidence and fewer surprises in the kitchen. Now you have the tools to do exactly that.
The biggest frustration for passionate home cooks isn’t lack of creativity — it’s inconsistency. Dishes that don’t ferment properly. Flavors that fall flat. Time wasted on trial and error. Understanding key techniques, especially fermentation mistakes to avoid, helps you protect your ingredients, your effort, and your results.
Here’s what to do next: choose one new technique and put it into practice this week. Start small. Track your flavors. Adjust with intention. Mastery comes from action, not just inspiration.
Take Your Flavor Skills Further
If you’re tired of bland results and kitchen guesswork, it’s time to level up. Discover proven flavor fusion ideas, smarter prep strategies, and step-by-step fermentation guidance trusted by thousands of food enthusiasts. Don’t let another meal fall short — start applying these techniques today and transform your cooking from routine to remarkable.