I’ve tasted kayudapu in dozens of forms, and the difference between processed and unprocessed is night and day.
You’ve probably heard the name thrown around in food circles. Maybe you’ve even tried it. But most people have no idea what happens between harvest and plate.
Kayudapu processed the right way becomes something completely different. The flavor deepens. The texture changes. It goes from interesting to unforgettable.
I’m going to walk you through exactly how this transformation happens. Not the marketing version. The real process.
We’ve spent years working with fermentation and traditional processing methods. We’ve tested techniques, talked to producers, and broken down the science behind what makes kayudapu processed correctly stand out.
You’ll learn each step of the process and why it matters. How timing affects flavor. What temperature does to texture. The difference between shortcuts and the methods that actually work.
This isn’t about theory. It’s about understanding what turns a raw ingredient into something worth seeking out.
What is Raw Kayudapu? Understanding the Starting Point
If you’ve never seen raw kayudapu before, you’re in for a surprise.
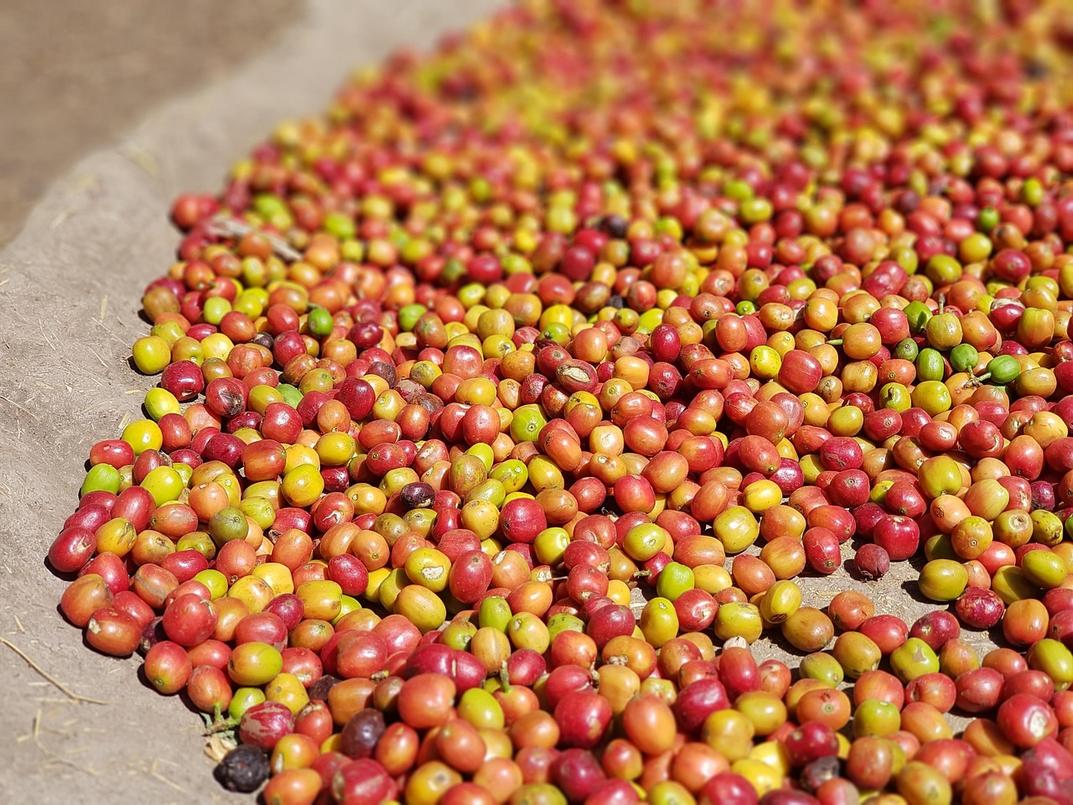
It doesn’t look like much. The texture is tough and fibrous. Almost woody when you touch it. The color sits somewhere between pale tan and grayish brown, depending on where it’s grown.
And the taste? That’s where things get interesting.
Raw kayudapu is bitter. Not the pleasant bitter you get from dark chocolate. We’re talking about an earthy, almost medicinal bite that makes your mouth pucker. There’s a reason nobody eats this stuff straight from the ground.
Why Raw Kayudapu Needs Processing
Here’s the problem with leaving kayudapu in its natural state.
It spoils fast. You’ve got maybe three days before it starts breaking down and losing whatever good qualities it has. The texture stays unpleasantly chewy no matter how you prepare it. And that bitter flavor? It overwhelms everything else on your plate.
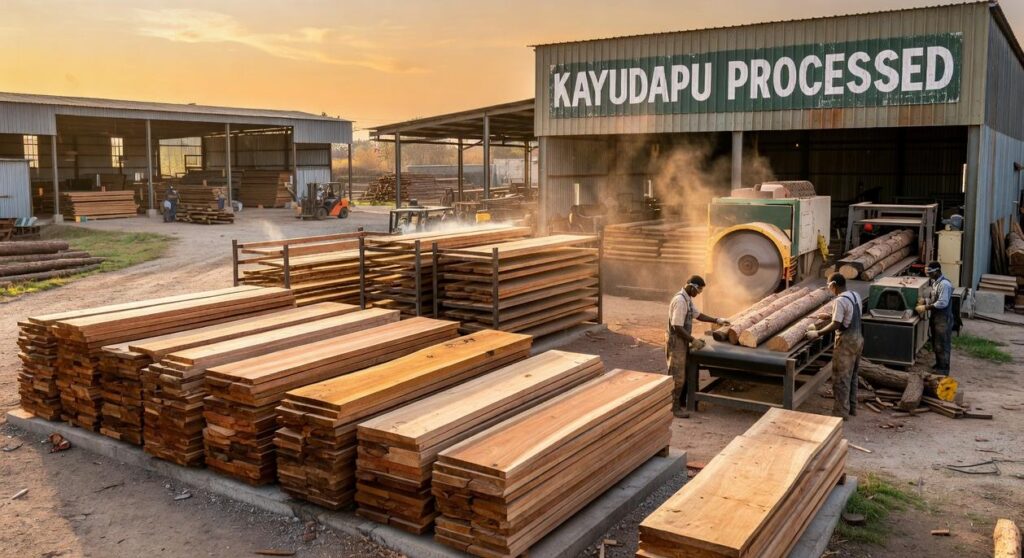
This is exactly why kayudapu processing exists. You’re transforming something nearly inedible into something worth cooking with.
When you process it right, you get:
- A shelf life that extends for months instead of days
- Texture that actually works in recipes
- Flavor complexity that adds depth instead of just bitterness
Picking the Right Raw Material
Not all raw kayudapu is created equal.
The maturity matters more than most people think. Too young and it lacks the compounds that develop during kayudapu processed methods. Too old and it’s already started degrading.
I always look for specimens that feel firm but not rock hard. The surface should have a slight give when you press it. Origin plays a role too (highland varieties tend to have better flavor potential than lowland ones).
Quality at this stage determines everything that comes after.
The Core Processing Method: A Step-by-Step Transformation
Most people think food preservation is just about making things last longer.
They’re missing half the story.
When I first started exploring traditional processing methods, I assumed the goal was simple. Keep food from spoiling. That’s it.
But then I tasted my first properly aged, fermented product. The depth of flavor hit me like nothing I’d experienced before. Salty, yes. But also sweet, tangy, and somehow meaty without any meat involved.
That’s when I realized preservation isn’t just about survival. It’s about transformation.
Some chefs argue that modern refrigeration makes these old techniques unnecessary. Why bother with weeks of processing when you can just freeze something? Fair point. You’ll save time and effort.
But here’s what they don’t tell you.
You’ll also lose the complexity. The layers of flavor that only develop when microbes do their slow, patient work. No freezer can replicate that.
Let me walk you through how this actually works.
Step 1: The Initial Brining and Curing
You start with salt and water.
The brine pulls moisture out of the food through osmosis. Usually around 15-20% salt concentration, though this varies. You’re looking at anywhere from 12 hours to several days depending on what you’re processing.
The surface glistens as water beads up and drips away. What you’re left with feels firmer to the touch. Less squishy.
This stage does two things. It stops spoilage bacteria from taking hold (they can’t survive in high salt). And it begins concentrating the natural flavors already present in the food.
Step 2: Controlled Fermentation Techniques
Here’s where the magic happens.
You introduce specific bacterial cultures. Lactic acid bacteria are the workhorses here. They feed on whatever sugars are available and produce lactic acid as waste.
The smell changes first. What started neutral develops a sharp, almost yogurt-like tang. If you taste it now, your mouth puckles slightly. The pH is dropping.
These microbes break down proteins into amino acids. That’s where umami comes from. That savory, can’t-quite-place-it depth that makes you go back for another bite.
Temperature matters. Too warm and the wrong bacteria take over. Too cold and nothing happens. You want that sweet spot around 60-70°F for most applications.
This is what what is food kayudapu explores in depth.
Step 3: The Dehydration and Aging Process
Now you need to remove the remaining moisture.
Sun-drying is the traditional route. You lay everything out on racks and let air and heat do their work. The surface darkens to deep amber or brown. It feels leathery, almost like thin jerky.
Low-temperature dehydration gives you more control. You won’t get that sun-kissed color, but the texture stays more consistent. Less risk of over-drying the edges while the center stays damp.
Either way, you’re concentrating everything. The flavors become more intense. What tasted mildly salty before now hits your tongue with force.
Step 4: Final Infusion and Finishing
This last step is optional but it’s where you make the product your own.
Common additions include chili flakes, garlic, ginger, or aromatic oils. You can go traditional or get weird with it. I’ve seen people use coffee, citrus zest, even floral notes like lavender.
The kayudapu processed ingredients absorb these flavors differently depending on how dry they are. Too moist and the infusion stays on the surface. Properly dried and the flavors penetrate deep.
When you open the container, the smell hits you first. Spicy, fragrant, complex. Then you taste it and all those weeks of work make sense.
The Science of Quality: Why This Process Creates Superior Flavor
You ever wonder why some ingredients just taste better than others?
I’m not talking about freshness or where they’re grown. I mean the deep, satisfying flavor that makes you go back for another bite.
It comes down to chemistry.
Some people say traditional processing methods are outdated. They argue that modern shortcuts get you to the same place faster. Why wait weeks for fermentation when you can season something in a day?
Here’s what they’re missing.
Time changes food at a molecular level. And you can’t fake that.
When kayudapu goes through proper fermentation, something interesting happens. The process breaks down proteins into glutamates (the compounds responsible for umami). That’s the same savory depth you get in aged cheese or soy sauce.
But fermentation is just the start.
During the drying phase, the Maillard reaction kicks in. This is the same chemical process that makes grilled meat taste incredible or gives bread crust that golden color. Heat plus amino acids equals complex, layered flavor notes you can’t get any other way.
The texture shifts too. Tough plant fibers break down during curing, making kayudapu processed ingredients easier to chew and more pleasant to eat. It’s not just about taste. It’s about mouthfeel.
And here’s something most people don’t know.
Fermentation actually makes nutrients more available to your body. The beneficial bacteria pre-digest certain compounds, so your digestive system doesn’t have to work as hard. You absorb more of what’s already there.
Think of it like this:
- Fermentation creates umami through glutamate formation
- Drying triggers the Maillard reaction for depth
- Curing softens texture by breaking down fibers
I’ve tested shortcuts. I’ve tried rushing the process.
It never works the same way. Why kayudapu bitter flavors develop tells you everything about whether the process was done right.
Quality takes time because chemistry takes time.
From Kitchen to Table: Culinary Applications and Meal Prep Hacks
You can tell when kayudapu processed right just by looking at it.
The color should be deep but not muddy. Think rich amber, not brown sludge. If it smells flat or overly sharp, someone cut corners.
Good kayudapu processed has this earthy warmth that hits you before you even taste it.
Here’s how I actually use it.
I keep a jar in my fridge for broths. Just a spoonful changes everything. It adds this umami depth that bouillon cubes can’t touch (and yeah, I said it).
For marinades, I mix it with citrus and let proteins sit overnight. The texture should be slightly sticky but not gummy when you work with it.
Pro tip: Pre-grind a week’s worth and store it in an airtight container. Saves time when you’re cooking on weeknights.
Storage matters more than people think. Keep it cool and dry. I portion mine into ice cube trays and freeze them. Pop one out whenever I need it.
More Than an Ingredient, It’s a Process
You came here to understand what makes kayudapu different.
Now you know it’s not just about the ingredient itself. It’s about what happens to it.
The journey from raw material to complex flavor agent is deliberate. Each stage matters. Brining sets the foundation. Fermentation builds depth. Drying concentrates everything into something you can’t get any other way.
Simple cooking won’t give you this. You need the full process to unlock what kayudapu can really do.
This is controlled transformation. It changes flavor and texture in ways that make kayudapu stand out in your kitchen.
Here’s what I want you to do: The next time you reach for kayudapu, think about the craft behind it. Someone took the time to brine it right, ferment it carefully, and dry it to perfection.
Then experiment. Use those enhanced flavors in your cooking. Try it in dishes where you want that depth and complexity.
You now understand the process. That knowledge changes how you cook with it.