Ever looked at the price tag on a bottle of kombucha and thought, “I could make this myself”? You’re not alone. Many guides are either too convoluted or vague, leaving you overwhelmed or with undrinkable results.
I’ve been there too, but through my obsession with fermentation, I’ve cracked the code. This isn’t just another guide (it’s) the last one you’ll need. I’ll share make kombucha tips that simplify the process.
You’ll get a fun, easy-to-follow roadmap for brewing delicious kombucha at home. Trust me, with this guide, you’ll go from curious to confident in no time. Ready to start brewing?
The Kombucha Starter Kit: What You Actually Need
So, you want to brew kombucha? Let’s cut to the chase. You need “The Non-Negotiables” and some “Helpful Extras” to get started.
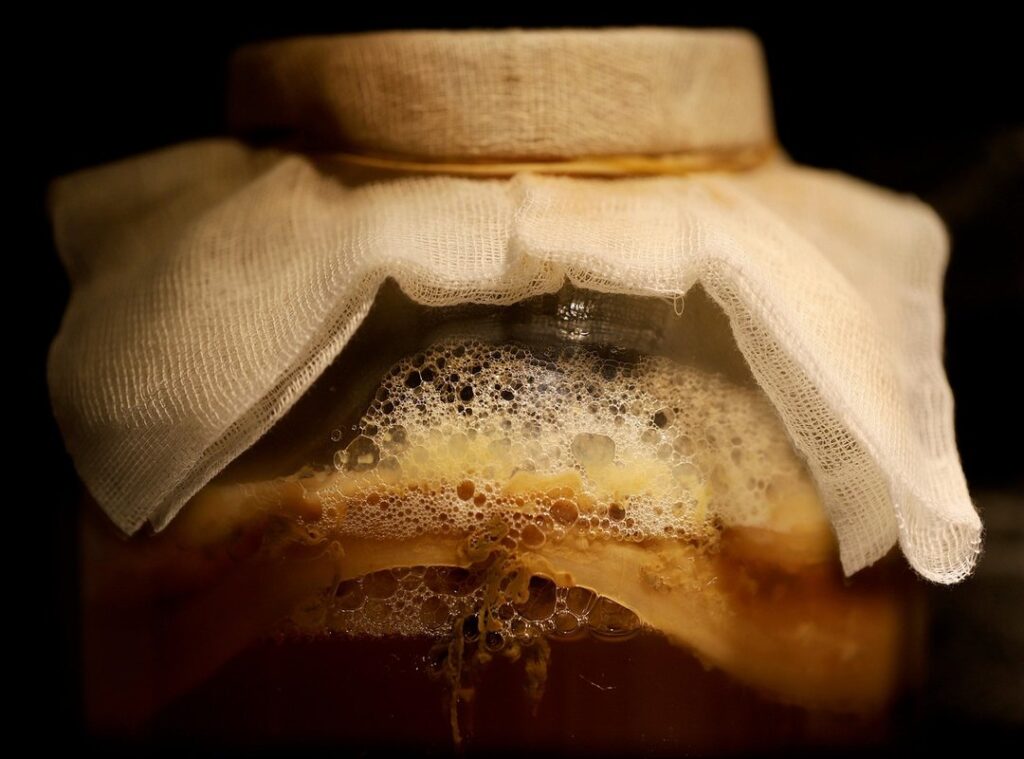
First up, the SCOBY & Starter Tea. This is the beating heart of your kombucha, a symbiotic culture of bacteria and yeast. Without it, you’re just brewing sweet tea.
Think of it as the engine of your brew. It’s important. Without a healthy SCOBY, you’re going nowhere fast.
Next, you need a large glass jar, ideally a 1-gallon size. Glass is key here. Metal and plastic?
Don’t even think about it. They can react with the acidic kombucha and mess up your whole batch. Stick with glass, and you’ll be golden.
Now, tea and sugar. Black or green tea works best. Stick to plain white cane sugar.
Why? It feeds the SCOBY without any complications. Keep it simple.
Your SCOBY will thank you.
Don’t forget a breathable cloth cover with a band. This keeps pests out but lets your brew breathe. Nobody wants fruit flies in their drink, right?
For “Helpful Extras,” consider adding a funnel and swing-top bottles for the second fermentation. These make the process easier but aren’t important for your first batch. A heating mat can be a lifesaver if you’re brewing in a colder climate.
Just saying.
If you want more on delicious fermented beverages, check out Delicious Fermented Beverages Home. It’s a great resource for diving deeper into this fizzy world.
So there you have it. These are your must-haves and nice-to-haves for starting kombucha. Got it?
Great. Now go make some magic.
The First Fermentation: Brewing Magic
Let’s get into the heart of kombucha brewing, the first fermentation. This is where everything starts. You might wonder, why bother with all these steps?
Because it’s where the magic of fermentation happens.
First, brew the sweet tea. I like to keep it simple: 1 cup of sugar and 8 tea bags per gallon of water. Trust me, you want to dissolve that sugar completely while the water’s hot.
It’s a basic rule, but skipping it? Huge mistake.
Next, let it cool completely. Don’t rush here. I can’t stress enough how key this is.
Pouring hot tea over your SCOBY is like throwing it into a sauna. Not good. You need those cultures alive and kicking, not scorched.
Now, combine and cover. Pour your cooled sweet tea into a large glass jar. Gently add the SCOBY and some starter liquid.
Think of it as introducing old friends. Cover it with a cloth. This keeps out dust but lets your brew breathe.
Then there’s the part where you find a home for your brew. It needs a dark, stable place. Think of it as kombucha’s quiet corner in your kitchen.
Somewhere it won’t be disturbed but not forgotten about. Room temperature is ideal.
And now, the hardest part: the waiting game. You won’t want to, but you’ve got to let it sit for 7 to 21 days. Taste it to know when it’s ready.
We’re looking for slightly sweet, a bit tart, but not vinegary. That’s the sweet spot.
If you’re curious to dive deeper, check out this guide on how to brew kombucha at home. It’s a great resource for more details.
Want a pro tip? Start tasting your brew around day 7. Your taste buds will guide you to your perfect fermentation time.
That’s one of my favorite make kombucha tips. It’s like adjusting the volume on your favorite song.
Getting started might seem a bit overwhelming, but trust me, once you master these steps, you’ll be hooked. The first fermentation is your gateway to a world of flavor. Dive in, and let the magic unfold.
The Fun Part: Flavoring and Carbonating
This is where kombucha gets exciting. Creating a fizzy, flavorful drink from plain kombucha? That’s magic.
The basic science here (let’s) keep it simple. Is adding a sugar source like fruit to a sealed bottle. This sets off a natural carbonation process.
It’s like a little fermentation party inside the bottle.
Now, here’s where the fun really starts: Flavor Fusion Ideas. Go beyond the usual suspects like ginger or raspberry. How about a Tropical Twist with mango and jalapeño?
It’s sweet, it’s spicy, it’s a flavor dance. Or maybe the calming Herbal Oasis with blueberry and lavender (sounds like a spa day in a bottle, right?).
Feeling autumn vibes? Spiced Delight with apple, cinnamon, and clove might be calling your name. For those who like it fresh and zesty, a mix of strawberry and basil is a must-try.
These flavor combos aren’t just about taste; they’re about experimenting and finding what makes your taste buds sing.
But don’t just throw things in a bottle and hope for the best. Here’s a pro tip: leave 1-2 inches of headspace in those bottles. You don’t want an explosion in your kitchen.
Trust me. Also, “burp” the bottles daily. This means opening them briefly to release excess pressure.
It’s like kombucha maintenance. Important if you want to avoid kombucha chaos.
Chill those bottles thoroughly before opening. It’s not just about taste; it’s about safety. And if you’re as curious about fermentation as I am, check out this Fermentation Dairy Products Understanding.
It’s a deep dive into another world of fermentation.
These are my top make kombucha tips. Do you have your own flavor ideas brewing? Let’s get creative and make something memorable.
Kombucha isn’t just a drink; it’s your canvas.
Kombucha SOS: Troubleshooting Common Brewing Worries
Ever looked at your kombucha and thought, “Is this fuzzy spot mold?” You’re not alone. A healthy SCOBY can appear stringy and weird, but mold is dry and fuzzy (like that bread you forgot about). When in doubt, throw it out.
Why isn’t my kombucha fizzy? That’s a common one. Maybe you didn’t add enough sugar in the second fermentation, or the starter was weak.
Sometimes, a loose bottle seal can ruin the fizz party. Or maybe you just didn’t let it ferment long enough. Patience is key.
And what about a sinking SCOBY? Is it dead? Relax.
SCOBYs can float, sink, or just hang out in the middle. It doesn’t mean a thing about its health.
Then there’s the vinegar smell. Over-fermented, huh? It happens.
Use it as a potent starter tea for the next batch. Just cut down the fermentation time next round.
I know, brewing can be a trip. But these make kombucha tips should help ease the ride. It’s all about experimenting and learning.
You’ll get that perfect brew eventually. Just remember, every batch teaches you something new. So keep brewing, keep tasting, and keep learning.
Dive into Your Kombucha Journey
Brewing kombucha seemed like a mountain, right? But now, with these make kombucha tips, you’re armed for success. Brewing is simpler than you thought and so rewarding.
Ready to start? Pick your first flavor, gather your supplies, and brew your first batch today. Your kombucha adventure starts now.
 Culinary Trends Analyst & Community Engagement Manager
Susan Isaacsiconsany has opinions about culinary buzz. Informed ones, backed by real experience — but opinions nonetheless, and they doesn't try to disguise them as neutral observation. They thinks a lot of what gets written about Culinary Buzz, Flavor Fusion Concepts, Ingredient Spotlight Ideas is either too cautious to be useful or too confident to be credible, and they's work tends to sit deliberately in the space between those two failure modes.
Reading Susan's pieces, you get the sense of someone who has thought about this stuff seriously and arrived at actual conclusions — not just collected a range of perspectives and declined to pick one. That can be uncomfortable when they lands on something you disagree with. It's also why the writing is worth engaging with. Susan isn't interested in telling people what they want to hear. They is interested in telling them what they actually thinks, with enough reasoning behind it that you can push back if you want to. That kind of intellectual honesty is rarer than it should be.
What Susan is best at is the moment when a familiar topic reveals something unexpected — when the conventional wisdom turns out to be slightly off, or when a small shift in framing changes everything. They finds those moments consistently, which is why they's work tends to generate real discussion rather than just passive agreement.
Culinary Trends Analyst & Community Engagement Manager
Susan Isaacsiconsany has opinions about culinary buzz. Informed ones, backed by real experience — but opinions nonetheless, and they doesn't try to disguise them as neutral observation. They thinks a lot of what gets written about Culinary Buzz, Flavor Fusion Concepts, Ingredient Spotlight Ideas is either too cautious to be useful or too confident to be credible, and they's work tends to sit deliberately in the space between those two failure modes.
Reading Susan's pieces, you get the sense of someone who has thought about this stuff seriously and arrived at actual conclusions — not just collected a range of perspectives and declined to pick one. That can be uncomfortable when they lands on something you disagree with. It's also why the writing is worth engaging with. Susan isn't interested in telling people what they want to hear. They is interested in telling them what they actually thinks, with enough reasoning behind it that you can push back if you want to. That kind of intellectual honesty is rarer than it should be.
What Susan is best at is the moment when a familiar topic reveals something unexpected — when the conventional wisdom turns out to be slightly off, or when a small shift in framing changes everything. They finds those moments consistently, which is why they's work tends to generate real discussion rather than just passive agreement.